
Nginx学习笔记
1. Nginx基本概念
1.1 什么是nginx
Nginx(“engine x”)是一个高性能的HTTP和反向代理服务器,特点是占有内存少,并发能力强,
事实上nginx的并发能力确实在同类型的网页服务器中表现较好。
Nginx专为性能优化而开发,性能是其最重要的考量,实现上非常
注重效率,能经受高负载的考验,有报告表明能支持高达50,000个并发连接数。
https://lnmp.org/nginx.html
1.2 反向代理
1.2.1 正向代理
- 在客户端(浏览器)配置代理服务器,通过代理服务器进行互联网访问。

1.2.2 反向代理
- 我们只需要将请求发送到反向代理服务器,由反向代理服务器去选择目标服务器获取数据后,
在返回给客户端,此时反向代理服务器和目标服务器对外就是一个服务器,暴露的是代理服务器地址,隐藏了真实服务器IP地址。
1.3 负载均衡
- 单个服务器解决不了,我们增加服务器数量,然后将请求分发到各个服务器上,将原先请求集中到单个服务器上的情况改成将请求分发
到多个服务器上,将负载分发到不同的服务器,也就是我们所说的负载均衡。
1.4 动静分离
- 为了加快网站的解析速度,可以把动态页面和静态页面有不同的服务器来解析,加快解析速度。降低原来单个服务器的压力。

2. Nginx安装
2.1 在Linux系统中安装nginx
- 2.1.1 官网下载.tar.gz包
- 2.1.2 安装前需要安装4个依赖包
yum install gcc-c++编译环境yum install pcre-develNginx的http模块需要使用pcre来解析正则表达式yum install zlib zlib-devel依赖的解压包yum install openssl openssl-develyum -y install gcc-c++ zlib zlib-devel pcre-devel openssl openssl-devel//一键安装上面四个依赖
- 2.1.3 安装nginx
- 解压缩nginx.xx.tar.gz包
- 进入解压目录执行./configure
- make && make install
- 开放端口(CentOS7)
firewall-cmd --list-all查看防火墙情况firewall-cmd --zone=public(作用域) --add-port=80/tcp(端口和访问类型) --permanent(永久生效)firewall-cmd --reload重启防火墙
2.2 nginx常用命令
./nginx -v查看nginx版本号./nginx启动nginx
./nginx -s stop关闭nginx
./nginx -s reload重新加载nginx(一般用于配置文件修改后生效)
2.3 nginx配置文件
1 | #user nobody; |
2.3.1 配置文件位置(根据安装类型不同,位置可能不一样,也可以自行配置地址)
/usr/local/nginx/conf/nginx.conf
2.3.2 nginx配置文件组成
- nginx配置文件有三部分组成
- 1)全局块
- 配置文件开始到events块之间的内容,主要会设置一些影响nginx服务器整体运行的配置指令。
比如worker_processes 1;,worker_processes值越大,可以支持的并发处理量也越多。
- 配置文件开始到events块之间的内容,主要会设置一些影响nginx服务器整体运行的配置指令。
- 2)events块
- events块涉及的指令主要影响nginx服务器与用户的网络连接。
比如worker_connections 1024;,支持的最大连接数
- events块涉及的指令主要影响nginx服务器与用户的网络连接。
- 3)http块
- Nginx服务器配置中最频繁的部分,也包括http全局块、server块
- 1)全局块
3. Nginx配置实例1-反向代理
3.1 实现效果
- 打开浏览器,在浏览器地址栏输入地址www.123.com,跳转到Linux系统tomcat主页面中。
3.2 准备工作
- 1)在Linux系统中安装tomcat,使用默认端口号8080
- 2)hosts文件nginx地址指向www.123.com
3.3 访问过程分析

3.4 nginx配置

- 补:

- location指令说明
location [ = | ~ | ~* | ^~] uri {}- 1) = : 用于不含正则表达式的uri前,要求请求字符串和uri严格匹配。
- 2) ~ :用于表示uri正则表达式,区分大小写。
- 3) ~* :用于表示uri正则表达式,不区分大小写。
- 4) ^~ : 用于不含正则表达式的uri前,要求nginx服务器找到标识uri和请求字符串匹配度最高的location后,立即使用此location
处理请求,而不再使用location块中的正则uri和请求字符串匹配 - 注意 : 如果uri包含正则表达式,则必须要有
或者*标识。
4. Nginx配置实例2-负载均衡
4.1 实现效果
- 1)浏览器地址栏输入地址 http://175.20.24.85/edu/a.html,负载均衡效果,平均8080和8081端口中
4.2 准备工作
- 1)两台tomcat服务器,一台8080,一台8081
- 2)在两台 tomcat 里面 webapps 目录中,创建名称是edu文件夹,在edu文件夹中创建页面a.html,用于测试
4.3 在nginx的配置文件中进行负载均衡的配置

4.4 nginx分配服务器策略
- 1)轮询(默认):每个请求按时间顺序逐一分配到不同的后端服务器,如果后端服务器down掉,能自动剔除
- 2)weight:代表权重默认为1,权重越高被分配的客户端越多
- 3)ip_hash:每个请求按访问ip的hash结果分配,这样每个访客固定访问一个后端服务器
- 4)fair(第三方):按后端服务器的响应时间来分配请求,响应时间短的优先分配。
5. Nginx配置实例3-动静分离
5.1 什么是动静分离

- 通过 location 指定不同的后缀名实现不同的请求转发。通过 expires 参数设置,可以使浏
览器缓存过期时间,减少与服务器之前的请求和流量。具体 Expires 定义:是给一个资源
设定一个过期时间,也就是说无需去服务端验证,直接通过浏览器自身确认是否过期即可,
所以不会产生额外的流量。此种方法非常适合不经常变动的资源。(如果经常更新的文件,
不建议使用 Expires 来缓存),我这里设置 3d,表示在这 3 天之内访问这个 URL,发送一
个请求,比对服务器该文件最后更新时间没有变化,则不会从服务器抓取,返回状态码 304,
如果有修改,则直接从服务器重新下载,返回状态码 200。
5.2 准备工作
- 在 liunx 系统中准备静态资源,用于进行访问。
5.3 具体配置

6. Nginx配置高可用集群
6.1 什么是nginx高可用

6.2 准备工作
- 1)两台nginx服务器
- 2)keepalived
6.3 安装keepalived
- 1)
yum install keepalived -y - 2)安装完后,/etc/keepalived/keepalived.conf配置文件
6.4 配置
- 1)修改keepalived.conf配置文件
1
2
3
4
5
6
7
8
9
10
11
12
13
14
15
16
17
18
19
20
21
22
23
24
25
26
27
28
29
30
global_defs {
notification_email {
acassen@firewall.loc
failover@firewall.loc
sysadmin@firewall.loc
}
notification_email_from Alexandre.Cassen@firewall.loc
smtp_server 192.168.17.129
smtp_connect_timeout 30
router_id LVS_DEVEL
}
vrrp_script chk_http_port {
script "/usr/local/src/nginx_check.sh"
interval 2 #检测脚本执行的间隔)
weight 2
}
vrrp_instance VI_1 {
state BACKUP #备份服务器上将 MASTER 改为 BACKUP
interface ens33 #网卡
virtual_router_id 51 #主、备机的 virtual_router_id 必须相同
priority 90 #主、备机取不同的优先级,主机值较大,备份机值较小
advert_int 1
authentication {
auth_type PASS
auth_pass 1111
}
virtual_ipaddress {
192.168.17.50 #VRRP H 虚拟地址
}
} - 2)脚本文件nginx_check.sh:
1
2
3
4
5
6
7
8
9
#!/bin/bash
A=`ps -C nginx –no-header |wc -l`
if [ $A -eq 0 ];then
/usr/local/nginx/sbin/nginx
sleep 2
if [ `ps -C nginx --no-header |wc -l` -eq 0 ];then
killall keepalived
fi
fi
7. Nginx原理
7.1 master和worker

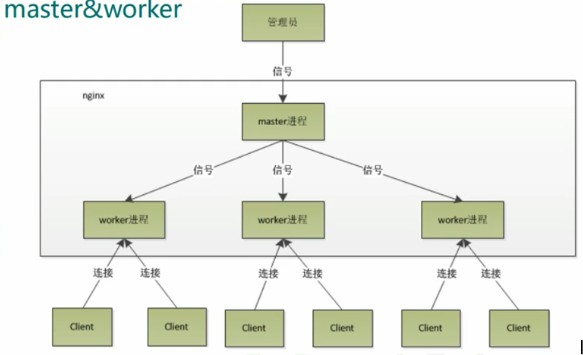
7.2 worker如何进行工作的

7.3 一个master和多个worker有好处
- 可以使用
nginx –s reload热部署,利用nginx进行热部署操作 - 每个 worker 是独立的进程,如果有其中的一个woker出现问题,其他woker独立的,继续进行争抢,实现请求过程,不会造成服务中断
7.4 设置多少个worker合适
- worker数和服务器的cpu数相等是最为适宜的
7.5 连接数worker_connection
- 第一个:发送请求,占用了woker的几个连接数? 2或者4个
- 第二个:nginx有一个master,有四个woker,每个woker支持最大的连接数1024,支持的最大并发数是多少?
- 普通的静态访问最大并发数是:worker_connections * worker_processes / 2,
- 而如果是HTTP作为反向代理来说,最大并发数量应该是 worker_connections * worker_processes/4。
本博客所有文章除特别声明外,均采用 CC BY-NC-SA 4.0 许可协议。转载请注明来自 Deneb!
评论


